For those of you who don't know, I am a budding psychologist (maybe a wilting psychology student...not sure if there is real a difference...) So I thought I'd share a psychological lesson I had to remind myself of today:
Even plans with the greatest of intentions often don't work perfectly on the first try.
I often talk to the families I work with about this - essentially it's the concept of don't give up if you hit a roadblock because no one and nothing is perfect.
It was my goal to take down and sand the door so I'd have something to do each day. That way I was moving forward on a project but it wasn't taking up all of my time.
Day 1: 1 hour spent sanding the side of the door. No muss, no fuss, I was excited (hence yesterday's post.)
Day 2: Got home, again was ready to go - Micheal wasn't necessary looking forward to the power sanding noise but gracefully obliged. 30 min sanding the bottom section.
Day 3 (today): Left externship, went to grocery store, it was cold out, Micheal had a headache, I'm tired... and it's 10:15 and no sanding. (And really no dissertation work, pretty much a wash of a night.)
Well crap, I failed the whole "do it everyday" goal - what happens? That temptation to just throw up my hands and let it become another unfinished project...or maybe go buy a door...
That's when I try to put my very expensive education to good use, what do I tell my kids? If it doesn't work perfectly the first time, don't give up. It's a small setback not a failure. Give it another try, and if it's still not working then maybe we need to reevaluate. And then I give myself a pep talk:
I can DO it! I'll let you know how tomorrow goes... ;)
I'm not much of a history buff, I never have been and likely never will be - I like to live in the moment and for the future. However, this house has sparked in me an interest about it's history that I have never experienced before. While the different layers of paint, flooring, wallpaper (etc) might drive me insane, they also represent the life of our house. Where has it been, who has lived in it, over 50 years of history right here under my fingertips.
This is likely related to the great affection I feel for this house and what it has meant for Micheal and myself. We both tend to forge strong emotional relationships with inanimate objects and it seems (at least for me) this house will be no different. My sense of intrigue, respect, and affection for our house was piqued today from a unexpected source. A pantry door... (crazy I know, just follow me.)
After posting my plan I took down the door:
When I took this photo Micheal said - are you really posting that mess on the blog?!
The door ventured downstairs and I started to peel back what turned out to be the layers of my houses' history. Seven layers to be exact.
From 1959 to 2010: Pink, peach, seafoam, orange, teal, beige, white.
This is just amazing to me! I ran up the stairs and started talking about the layers on the door (and Micheal look at me like a crazy women) - but imagine, how many colors has my kitchen been? How many "design fads" has it been through? When was it orange and isn't that crazy that the kitchen will be orange again?!
I feel a sense of responsibility to bring our house back to it's original glory; to improve upon the already wonderful base instead of to demolish and start anew. I think this is why I'm willing to spend a week sanding down layers of paint - could I buy a new door? Yes. Could I buy a door from community forklift that will take less effort to refinish? Yes. Would it be my kitchen's door? No.
So obviously I'm feeling pretty mushy about our house right now, so I ask you - what did or does your first house mean to you? What do you remember about it if you no longer live in it? What mark did you leave on it that in 50 years the owners will think "wow, when was this kitchen orange?" If you're in your first home, what does it mean to you? Is it simply a place to live? An accomplishment? A starter house or a house you see yourself in foreseeable future?
1. That the html code on our blog was causing major problems! So far I have found out that it froze three people's computers and my friend Ashley could only follow the comments section. Crazy! (Should all be fixed up now!)
2. Our kitchen has been at least 7 different colors.
3. I was emotionally ready to begin watching basketball again.
4. We evidently use flat head screw-drivers a LOT more than we use phillips!!
5. My cats can smell shrimp from the other end of the house!
SHRIMP?!
6. I should screen all Syfy marathons before we start them...
(gotta run..I think Moshe's going after the shrimp...)
It appears that our blog has been causing some people's computers to freeze up! At first it was just my sister-in-law Jolene so I blamed it on a fluke and her kids messing with her computer. :)
But I just received an email from my friend Leslie over at The DIY Diaries that one of her readers was trying to access my page and it froze her computer as well!
So for now I have reverted to a standard Blogger format (although I hate being unoriginal...) and will slowly add in the F2F components to see if there was something in my previous formatting that was causing the problems.
We LOVE new readers - so hopefully these technical difficulties will be resolved soon!!
I'm going to submit our monster of a hill desolate wasteland yard to America's Most Desperate Landscape on DIY Network! There is so much that needs to be done to the yard to make it livable it would just be FAB if the guys from DIY wanted to come do it for me!
After I have submitted our photos I will send out an update so you all can go "rate" our yard!
...is anybody home at F2F? Yes, yes we're here...on the couch...writing, writing, writing. Micheal is presenting a section of his dissertation at the Midwest Political Science Association conference in April so he has been working diligently on that project.
This has turned into our annual Team S vacation, just a little fun getaway. Last year we were shopping for Micheal's suit for our wedding! This year our good friend Justin (check out his blog The Bowtie Professor) is joining us.
I have been diligently working on my dissertation with the goal of proposing it this semester. This may or may not still happen, but I'm going to try! Both of these things combined have lead to minimal progress on the house. While this is okay in the short term, I'm afraid we're going to get too "comfortable" with the state of things and not continue to move forward with the renovation. It's a lot easier to come home in the evening and watch TV than to do home projects!
So it's my goal to identify some small projects that we can be working on during academic breaks.
Here are the things we have been talking about lately that are next on our list:
1. Updating the kitchen (one small piece at a time...)
2. Spring lawn care
Two major projects that we definitely don't have the time to tackle all at once. So how do you move forward with so much else on your plate without getting overwhelmed? Break it down to super small projects, then smaller steps of those smaller projects. We need successes people! :)
So what's first?
The Pantry!
However, "The Pantry" is still a pretty big project because I want to clean, paint, and organize. So where do you start? It's always best to start at the beginning...
The Door - At first glance, not so bad. But close up this is what I see:
So I'm going to take down the door, put it on the saw horsies and sand every opportunity I get (those slats are going to be brutal...). It's a nice project because I can start and stop as I need to and it doesn't require a lot of setup/tear-down.
Again, not much (okay...nothing) done to the house this weekend...
I think we're in a bit of a house, funk - we've reached a place where nothing is falling down and any next step is a bigger project. Undertaking a big project right now is a scary thought for me because we have SO much going on. I'm interviewing for externships this month, March Madness (GO HAWKS!!), dissertating, parents visiting soon... So I think I need to make a list of small projects, or parse out a larger project (maybe..the kitchen?!) into smaller parts we can work on getting done.
So with no housework what did we learn this weekend?
1. There is a Nordstrom Rack 15 minutes from my house!!! (Only 1 minute from where I work on Tuesdays...) Amazing and dangerous news all at once.
2. Filing taxes as a married homeowner is WAY more exciting than a single renter.
3. I have an internet addiction (shocker) - I was allowing the computer to distract me from KU games! :-o!! I re-learned that I enjoy KU games much more with the computer to the side rather than in my lap.
4. When fighting the the insurance evil underlords don't give up...sometimes you might ACTUALLY get your way!
5. My mom and step-dad are coming on April 8th!! WOO HOO!!
6. The regular inhabitants of our back yard are now up to: 4 deer, 2 fox(es?), a orange Morris cat, a gray and a black squirrel. The black squirrel is the alpha squirrel, he tortures the gray squirrel.
7. Maryland is likely the MOST difficult place to get your car tagged and titled. If you want to get a tag make sure to bring your ID, your marriage license (if you were recently married), proof of insurance, a DNA sample, an affidavit for your first born... (I finally got it done though!)
So we're going to try and get our motivation up and get some stuff done! Of course this will all be planned around March Madness and my overall #1 Jayhawks!!
Upcoming Posts: The Kitchen Plan: Smaller Steps to a Larger Goal.
We didn't do much other than dissertate this weekend...did we learn anything?
KU is way better at basketball than Mizzou....nope, already knew that.
One disadvantage to having my office in the basement is it's on the same level as the litter box (which can lead to some major stench...)
So no, didn't learn much this weekend so instead of "What we learned" I'll replace it with "What we bought!!"
12 sheets of mosaic tile! 2 square feet...for the amazingingly LOW price of (drumroll please...)
ONE DOLLAR A SHEET!!!!!!!!!!!!
We hit up Community Forklift right as they were bringing in surplus mosaic tile. A tile store had gone out of business and thrown it all into the dumpster! There were some really pretty red and slate tiles that we were trying to "work" into a kitchen plan but ultimately decided that we didn't want to plan the kitchen colors around tile. So we picked this neutral tile to go in the floor of our shower when we renovate it.
This was all when we thought it was going to be like $3.50 a sheet, but the guy up front was saying $1 a sheet so we went with it. Pretty sure that deal wasn't going to last very long once the dust settled so we took our deal and headed outta there.
So now we have flooring and tile for our master bathroom! Squee!! We'll just keep compiling and it'll happen someday. :)
As many of you know, I tend to be a bit of a penny pincher. So when we started talking about putting up shelves in our bedroom I was floored by the cost of standard floating shelves like this at Lowes:
$31.48?? For a piece of stained wood MDF?? And I wanted two...
Or you could pay close to $199 per shelf if you are fancy and shop at Pottery Barn:
I think I might still make this shelf, just to prove how easy and inexpensive it is...
When googling "how to make your own floating shelf" there were a few options: 1. Using a hollow core door, 2. Building a box shelf with pine - but nothing really about slapping a big piece of wood up on the wall. No directions huh? It's okay, we were up for the challenge! Who reads the directions anyway?
Oh...you do? Okay then, here are the directions to make your own fabulous floating shelf out of solid wood (no particle board around here!).
What you will need:
1. A piece of wood the sized to what you want (we used "vintage" white oak found at our local surplus store, $7 for a 7 foot piece!)
2. A circular saw or table saw
3. Power hand sander with 100 grit sand paper (or you can use regular old sand paper and some elbow grease.)
4. Stain or paint - we used Minwax's Stain and Poly all in one
5. Blind Shelf Supports
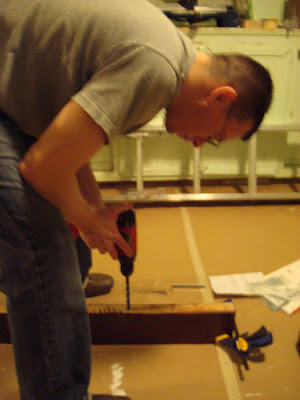
6. Power Drill
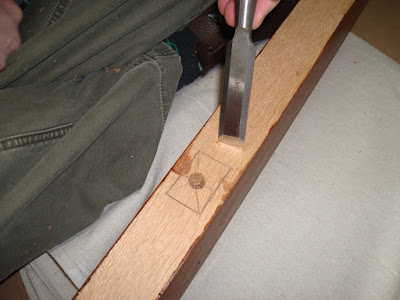
7. Chisel
8. Foam Brush
9. Sheetrock Anchor Screws
10. 7/16 and 1/4 inch drill bits
11. Dremel with metal cutting wheel
Step 1: Decide what width and depth you want your shelves. Ours are 39 inches wide/long and 5 inches deep. Make your cuts.
Step 2: Sand your shelves until smooth, we chose to round the corners a little instead of having sharp edges.
Step 3. Stain or paint.
Now it's time to leave the workshop and head up to where you'll be hanging the shelves!
Step 4. Determine where you want to hang the shelves and find the stud for at least one of your anchors. (We used the "knock" method, hollow echo = no stud, solid no echo = stud.) Studs are generally 16" apart so you can also get a good estimate of where to start by measuring 16" from the corner.
Step 5. Measure and mark where the stud would be on your shelf and then make another mark so the brackets will be evenly spaced.
Step 6. Drill the holes where your brackets will go. A tip to make sure you don't go through the front of your shelves: Hold the drill bit next to the shelf and put a small piece of tape on the bit where you should stop drilling.
Step 7. Now we have to chisel out a notch in the back so the shelf will sit flat against the wall.
Step 7: Measure the shelf brackets in the holes to see if they need to be shortened. Ours were about 1 inch too long so we used the Dremel (my favorite new tool) to cut off the edge of the bracket.
Step 8: Now you're ready to hang! Use the power drill and a 1/4 inch drill bit to make the holes for the sheet rock anchors where you want to hang your brackets. Use a rubber mallet to put the anchors into the wall (instructions on back of package.)
Step 9: Hang the shelf brackets on the wall and slide the shelves into place.
Voila!
They're not fully decorated yet (obviously) so I'll post that when I'm done.
Costs:
Wood: $7
Brackets: $30
Stain: "Free" leftover from my dresser
7/16 Drill Bit: $8 (but we'll use it again...)
Drywall Screws: $3
Total: $48 for two solid wood shelves that match the wood in our bedroom. It was a little more than I wanted to spend - I'm still going to try and figure out a cheaper way to recreate the brackets. But all in all I'm very happy with them!
Wow, this is the longest I've slacked but I feel like I have good reasons. :) The baby shower went off without a hitch this weekend! I don't have any pictures because I used the mom-to-be's fancy DSLR camera and am waiting for her to post them.
After the baby shower I worked furiously to finish up my first draft of my dissertation proposal! It was submitted Monday evening and we celebrated with nice bottle of red wine, hence the no WWL post on Monday. :) Yesterday...I was just lazy.
So without further ado...WWL:
1. I really want a DSLR camera...they are fabulous.
2. My husband is amazing (okay so I already knew this, hence the marrying him thing) - he painted, cleaned, hung, kitty-wrangled... All in all he was just fabulous.
3. You are your own worst critic. I got a lot of compliments on the house, someone even said "what do you have left to do?" HA!
4. Some strategically placed curtains and closed doors can make your house seem much more put together and finished than it really is - the art of distraction!
5. My baking soda went bad, this = flaaaaat cupcakes. Good thing I did a test run!
6. Chocolate chips float really well in devil's food cake.
7. We work much better with deadlines - so much got done working towards the shower!