During my comprehensive exams I started a rather popular blog entry called "Things I learned today" - it was pretty dang funny (if I do say so myself), however I was stressed, sleep deprived and on the verge of a mental breakdown...
So I'm going to try and recreate that recurring entry with F2F! Except it's going to be things we learned this weekend and hopefully I can get Micheal to chime in. :) And sometimes we are stressed, sleep deprived and on the verge of a breakdown or two, so maybe it'll be just as interesting!!
With further ado...
Things we learned this weekend:
1. Don't leave anything visible in your car that might even SEEM valuable (even if it's not) cuz someone might rob you of $1.75 and you'll still have to replace your window.
2. Dunkin Donuts only has chocolate Munchkins if you come before 10am (I swear!) but if you've been craving them and you buy 50 Munchkins your husband might look at you like you're crazy when you get home.
3. Home improvement tools are one of the most enticing items for home burglars (so says our friendly neighborhood cop) so don't leave them out in plain sight!
4. If you try to put a new light bulb into a socket that happens to have a broken off light bulb that you didn't see it will spark and freak you out (and probably make you drop the light bulb...)
5. Moshe is a born hunter, when taken outside on a leash in approximate 6-8 inch grass (don't judge us...it's in the back, no one can see it!) he acts like a lion stalking his prey (leaves) through the grass. Hil-ar-ious!
6. When you go to Target and are only going to get two things, don't get a cart - no seriously, it's a bad idea... ($60 and 10 items later...)
7. The Nationals (DC's MLB team) have an AMAZING stadium!! And an even more amazingly bad team... Potential uses for Nationals stadium besides actually watching baseball: Eating 7 dollar chili dogs, playing PS3 in the kids area, enjoying a quiet evening with friends (surrounded by the opposing team's fans), watching fireworks (!!) and almost getting puked on by small children.
There we go - these are some things we learned this weekend, how about you?

Monday, September 28, 2009
Sunday, September 27, 2009
Well that sucks...


We're angry, bummed, stressed and just perturbed with people in general.
Stay tuned for a post on installing security and motion lighting on your house. :)
Saturday, September 26, 2009
Refinishing Furniture
We have collected three dressers that it is our plan to refinish. You've seen pictures of mine which is coming along nicely, we've also picked up one for Micheal and a small one to put in the guest bedroom.
Refinishing furniture rather than buying new has many benefits!

This is Micheal's dresser, it was a free pickup from Arlington and a nice young couple that had made the silly mistake of painting the inside of the dresser as well as the outside. It mad it so the drawers would not slide in and out. So Micheal is sanding it down and will repaint it black to match his nightstand.

This is a dresser that I literally found in a parking lot when I was actually going to look at another free desk (that ended up being gross). It's a little shabby looking and Micheal kinda gave me the side-ways eyeball when I made him come get it, but I maintain it's gonna be a nice little dresser when I'm done. I'm going to sand and paint it white and spray paint the top gray.

Here is the status of my dresser. As you can see I have sanded 4 out of the 5 drawers and the top of the dresser. I have the stain already purchases and as soon as I patch all of the little holes and sand the last drawers I'm going to stain it! I'm still looking for new (old) drawer pulls as this one was missing a few and a few were broken. I really think it's going to be beautiful.
Stay tuned for progress on this, this master bedroom (trim going up this weekend!!!) and a how-to for removing can lights and patching your ceiling.
Refinishing furniture rather than buying new has many benefits!
- Keeps old furniture out of the landfill - good for the environment!
- Cost effective - if you have the time, patience and skill to put in
- Can personalize to your space


This is a dresser that I literally found in a parking lot when I was actually going to look at another free desk (that ended up being gross). It's a little shabby looking and Micheal kinda gave me the side-ways eyeball when I made him come get it, but I maintain it's gonna be a nice little dresser when I'm done. I'm going to sand and paint it white and spray paint the top gray.

Stay tuned for progress on this, this master bedroom (trim going up this weekend!!!) and a how-to for removing can lights and patching your ceiling.
Tuesday, September 22, 2009
Thank You Uncle Sam! (Almost...)
My wonderful husband called the government today and they are scheduled to mail out our first time homebuyer rebate PLUS interest (an extra $144, hello new rug!) on Friday!!!!
WOO HOO!!
WOO HOO!!
Sunday, September 20, 2009
Taming the Beast
.JPG)
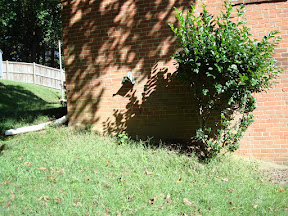
Here is a pic of the overgrown shrubs...half dead evergreen...weedy hillside...and the awful holly trees by the front door.
Unfortunately (for our neighbors) the lawn got pushed to the back burner with all of the other major issues inside the house that needed to be addressed. Then we FINALLY bought a lawnmower; this really felt like the lynch pin of home ownership for us! Only for it to rain...and rain...and rain. Every.darn.weekend.

Isn't she a beauty?! A pretty red Craftsman Self-propelled mower. Well last weekend we braved the wet grass and mowed part of the lawn! Only part because we only had enough gas for part of a tank, but man did it make a difference! I'm going to make this picture pretty big so you can see just how long the grass actually was, this was our first path:

It's a pretty impressive swath, after about 10 or 15 minutes of mowing Micheal says to me "Man...I didn't realize quite how big our lawn really is!" It is a big lawn, but this was before he took my advice and used the self-propel option. Pushing through that jungle without it was exhausting I'm sure!
 Of course I wasn't going to let Micheal have all the fun...
In the process of mowing we also discovered
Finally, here is a video of Micheal tackling our insane hill that ultimately we want to landscape with a retaining wall so we have less of it to mow. As you saw from the last post we've started collecting the bricks to make it!
Doesn't that look fun?!
We officially no longer the 2nd worst lawn on the block. :)
Friday, September 18, 2009
Project Status Updates
 I'm sorry for the drop off in posts this week, I was attacked by the nasty cold virus going around last Thursday. So for renovations last weekend I was pretty much worthless!
In thinking about what to blog about and being disappointed that I didn't have any amazing before an after pictures to post I realized an important lesson. Renovating an entire home is a process and it's going to take a while to reach the goal of the after so it's important to note the progress as you go along.
So here are a few status updates about where we are in different projects:
Refinishing trim for master bedroom - we have about 75 percent of the trim sanded and repainted. This has been a major project and a total pain in the butt. When we're done I'll post about the process we went through to finally get them to their newly refinished state. A few process pics:
 An idea of what it looked like before
One of the pieces sanded down to bare wood - turns out they are actually multiple pieces of wood dovetailed together! Neither of us had seen trim made like this, my mom informed me that it was a common practice to make cheaper trim - huh who knew?


Refinishing Dressers from CL:
I have sanded the top of my dresser (water stains gone, yay!) and the front of four of the drawers. I am in the process of searching for replacement drawer pulls that match the dresser and plan to finish sanding this weekend. Maybe I'll even get to stain!
Micheal started sanding his today, I'll post pics of what we're doing tomorrow.
Latest Craigslist Find:

Guest Bathroom: Didn't know that was currently on the list? Well it wasn't...until this happened...

During a rainstorm two weeks ago water started leaking from the ceiling. There had obviously been damage before but we hadn't dealt with it yet because it wasn't a pressing issue. Micheal went up into the attic to find our attic exhaust fan (that doesn't work) was leaking into our attic and had likely been doing so for a while. Great!! The hole was actually made by Micheal's foot, just trying to speed the demo process along. ;)
So that's where we're at on some different projects! Hopefully we'll have some completed work to sit back, enjoy, and share soon!
Monday, September 14, 2009
Where to put my garden?
Hey all you ladies and gentlemen with green thumbs, I need your help!! I'm trying to decide where to put my garden. I have a few options each with their pros and cons so I'm looking for some reader input to help me decide. Some issues we will be dealing with are: poor sun exposure (we have tons of lovely, huge shade trees), woodland creatures (we are right next door to a nature preserve, so deer, squirrels, rabbits, and every type of bug imaginable), sloping yard (see our upcoming "Mowing a Hill" post) and so on.
Place your vote below and then leave me a comment with your reasons why you chose the space that you did!
Option 1: Ease Side of House
This was my first inclination but I'm starting to have doubts.

Pros: Right out side the kitchen (once we get the door fixed...), furthest from the woodland creatures (they would have to cross the yard and be fully exposed to the street), and fairly level.
Cons: Variable sun exposure, not much room to expand, close to the trash and recycle cans.
Option 2: West Side of House
Pros: Excellent all day sun exposure, lots of room to expand, and fairly level.
Cons: Furthest from the kitchen and closest to the woods (like 3 steps from the woods.)
Option 3: Rear of House

Pros: Close to kitchen/back door, some sun exposure in the morning, will get water runoff from hill, and windows may provide some woodland creature deterrant.
Cons: Small space, may want to build a deck/patio in the future, and not sure about the quality of the soil.
Option 4: Top of Hill

Pros: Lots of uncultivated space...
Cons: Most secluded and might invite previously named woodland creatures, plants might have to compete with trees for soil nutrients, and very shaded. (Oh yeah...and I'd have to climb up the hill.)
Like I said, none of these are the ideal garden location but it's what I've got - and the F2F motto is to try to work with what you have available to you! (Alright...so that's my motto, not so much Micheal's.)
If you read our blog via email or reader you'll need to click on the Title "Where to Put My Garden?" to take you to the original webpage. There you can vote and leave comments (as with any other post you find particularly interesting!)
Place your vote below and then leave me a comment with your reasons why you chose the space that you did!
Option 1: Ease Side of House
This was my first inclination but I'm starting to have doubts.
Pros: Right out side the kitchen (once we get the door fixed...), furthest from the woodland creatures (they would have to cross the yard and be fully exposed to the street), and fairly level.
Cons: Variable sun exposure, not much room to expand, close to the trash and recycle cans.
Option 2: West Side of House
Pros: Excellent all day sun exposure, lots of room to expand, and fairly level.
Cons: Furthest from the kitchen and closest to the woods (like 3 steps from the woods.)
Option 3: Rear of House
Pros: Close to kitchen/back door, some sun exposure in the morning, will get water runoff from hill, and windows may provide some woodland creature deterrant.
Cons: Small space, may want to build a deck/patio in the future, and not sure about the quality of the soil.
Option 4: Top of Hill
Pros: Lots of uncultivated space...
Cons: Most secluded and might invite previously named woodland creatures, plants might have to compete with trees for soil nutrients, and very shaded. (Oh yeah...and I'd have to climb up the hill.)
Like I said, none of these are the ideal garden location but it's what I've got - and the F2F motto is to try to work with what you have available to you! (Alright...so that's my motto, not so much Micheal's.)
If you read our blog via email or reader you'll need to click on the Title "Where to Put My Garden?" to take you to the original webpage. There you can vote and leave comments (as with any other post you find particularly interesting!)
Friday, September 11, 2009
The Necessary Abominations
Probably the most difficult aspect of an extensive renovation is that there are a myriad of things needing work making it difficult to calculate where to begin. The process is testing my OCD, though we are referring to the renovations as exposure therapy. The greatest hurdle for me is having to settle for a quick fix rather than the complete renovation.
The kitchen sink is a great example. This is the before picture.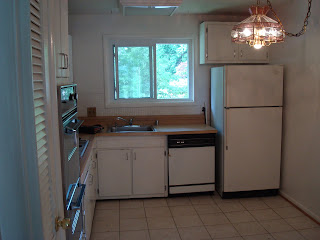
I pulled the refrigerator and the dishwasher - which had its height adjusting legs grouted into the tile. In the process of removing the dishwasher I pinched the copper line causing a small leak and a wading pool for the kitties on the kitchen floor. I tore out the lower cabinet to be greeted by soaked pressed wood (ridiculously this is the subfloor).
Originally (and still) I wanted to tear out the old tiles and remove the cabinets to start over in the kitchen (I admit this is always my first choice, cut the chaff and start over, though I'm not sure on the wisdom of this approach in all scenarios). Kari reeled me in, so we had to find a way to fix the floor. We opted for tiling the small section.
 We purchased the tiles from the Community Forklift. I used a floor patch material that could be troweled over the subfloor instead of a thin-set to level the small section (an added plus is that the floor patch and the grout is mold and mildew resistant). I wanted the new tile section to be level with the old tile but this wasn't an option. The kitchen floor consists of subfloor, substrate, two layers of linoleum and then ceramic tile. Its tomfoolery like this that provokes me to tear it all out. The "fix" was to not stress over the depth of the new section but to level the tiles and use a 1"x1" wood border to create a more dramatic aesthetic break (as if the drastically different tiles wasn't enough).
This is what I refer to as a necessary abomination. Its not what I wanted, it still causes me anxiety to look at it but it was necessary to move on to far more important problems. When the dust settles and we move to working exclusively on the kitchen I will revisit the floor.
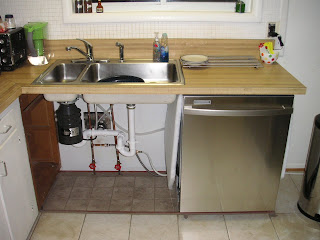 The end product doesn't look as obnoxious. Its amazing what a new dishwasher, new sink, new garbage disposal, and new plumbing have done.
The kitchen sink is a great example. This is the before picture.

I pulled the refrigerator and the dishwasher - which had its height adjusting legs grouted into the tile. In the process of removing the dishwasher I pinched the copper line causing a small leak and a wading pool for the kitties on the kitchen floor. I tore out the lower cabinet to be greeted by soaked pressed wood (ridiculously this is the subfloor).
Originally (and still) I wanted to tear out the old tiles and remove the cabinets to start over in the kitchen (I admit this is always my first choice, cut the chaff and start over, though I'm not sure on the wisdom of this approach in all scenarios). Kari reeled me in, so we had to find a way to fix the floor. We opted for tiling the small section.
 We purchased the tiles from the Community Forklift. I used a floor patch material that could be troweled over the subfloor instead of a thin-set to level the small section (an added plus is that the floor patch and the grout is mold and mildew resistant). I wanted the new tile section to be level with the old tile but this wasn't an option. The kitchen floor consists of subfloor, substrate, two layers of linoleum and then ceramic tile. Its tomfoolery like this that provokes me to tear it all out. The "fix" was to not stress over the depth of the new section but to level the tiles and use a 1"x1" wood border to create a more dramatic aesthetic break (as if the drastically different tiles wasn't enough).
 This is what I refer to as a necessary abomination. Its not what I wanted, it still causes me anxiety to look at it but it was necessary to move on to far more important problems. When the dust settles and we move to working exclusively on the kitchen I will revisit the floor.
 The end product doesn't look as obnoxious. Its amazing what a new dishwasher, new sink, new garbage disposal, and new plumbing have done.
Wednesday, September 9, 2009
Bargain Hunting 101
Anyone who knows me knows that I am the queen of frugal - my deal searching abilities are unparalleled (except maybe by Ashley) and I have been putting those skills into full force with this home renovation.
You have already been exposed to some of my craigslist searching (Jolene thinks I'm going to become a hoarder...) but I want to share with you an amazing warehouse that has been an excellent source of good deals.
The Community Forklift
This is a non-profit group that has filled a niche by providing salvaged, surplus & green building materials. I love this place and could probably go everyday to see what new things they get in. So far we have found some very good deals including:
A base cabinet that matches our kitchen cabinets so we can expand - $5
Ceramic tile to tile underneath the kitchen sink - like 15 cents a piece I think?
My painting ladder!!! (4 ft) - $4!!!
A new (to us) stainless steel sink - $20
Cork flooring - these were samples and we bought them for $1/piece (about 1.5 sq ft) and got enough matching to do our bathrooms! Cork is a green resource and will be a nice way to soften and warm up our bathroom.
Misc - lights (super cheap), that bar that goes from your shower head into the wall, new in package for $4/piece
The sliding glass door to replace the front window mishap - $30
They also came and picked up our old appliances for donation - tax writeoff, woohoo!! I tried to search in the KC area and didn't find one of these shops, but if you do find one make sure to check it out. Not only is it cost efficient (appeals to the frugal side of me) it's good for the planet to reuse materials so it doesn't end up in a landfill somewhere (the new green side of us.)
Tuesday, September 8, 2009
How to Build a Custom Closet on an F2F Budget
When we started on our MBR about a month ago my closet (yes I claimed the bedroom closet AGAIN!) looked like this:

We decided to strip it totally down and start over so we removed the shelf, bar and doors, then sanded and primed it:

Then we painted the interior a neutral color (SW's Linen), this is the neutral color that we're using on the main rooms of our house so I count it as "free" since I used what we already hand!

Next was to sand, prime and paint the trim. We hand sanded the trim with 100grit sandpaper enough to rough it up so paint could stick and to get through the top layer of disgusting oil-based paint. Then I taped the wall above the trim with blue painters tape and used a 2 inch angle brush to prime (one layer) and paint (one layer). I have found that painting trim with long brisk brush strokes results in a much better look (much smoother) than trying to go slow and get straight lines (what I did at first.)
You can see in the last picture I had painted the wall access panel the same color as the wall but I later decided that I liked it better matching the trim so repainted it.
Now it's all painted and ready to be reassembled so you need to decide what you want the setup of your closet to be. We looked at closet systems at Home Depot for inspiration and for the basics it runs anywhere from $70 to $200 for just the starter kit. This is not in our budget so we set out to recreate this and more for less money.
Enter - CRAIGSLIST!! I know, I know...I'm an addict.
Micheal found a shelving and drawer system on CL for $30, so we went and picked it up and started designing around it. I decided that I wanted the system in the middle with a high and low bar on one side for shirts and pants and a high bar on the other for long items such as dresses and skirts. This required us to purchase 3 bars @ $8/piece.
Here is the unit-

With the drawers and bars this unit would have cost approximately $250 from Home Depot - our budget model, $54!!
Problem #1:
The first of our difficulties in retrofitting this piece of furniture to the existing closet was that it was about 1 inch taller than the existing shelve mount (which we would be reusing.) So our first fix was to put 1x1 wood pieces (leftovers from another project - "free"!) around the shelving mount to try and level it out:

Problem #2:
This made it just a shade too tall...ugh... The only tool we had that we could try to trim the ends was a jigsaw...I don't have any pictures of this because it did not go well...at all...
To try and maintain our sanity and the usability of the closet unit we went to Home Depot to invest in the proper tools (le sigh...so expensive).
Let's just say after the jigsaw debacle one side of the shelf was now a bit short so we used the aforementioned 1x1 pieces of wood (still free!) instead to increase the height of the closet unit. So after some trimming and screwing it was the right height!
Oh yeah...power tools baby - look at that smile!

We were fortunate to have wood mounts already attached to the wall so Micheal was able to drill the high bars directly into the wall, then attached them to the shelving unit by drilling a starter hole and using two bolts to attach the bracket.
The bracket...was a smiley face!

Micheal says "Measure twice, cut/drill once!"

After we installed the three bars this was the finished project!!

I LOVE it!! I stained two pieces of wood with our red stain (again from another project) to use as the shelve above the closet unit. I'll post pics of it once I upload them. I'm so proud of our effort as this was a test of our creativity, frugality and patience but has ended in a successful closet (that will only look this clean once!)
What do you think? Who wants their own custom CL closet?? If you have pictures of your closet that we could post or share for inspiration please send them on over!
We decided to strip it totally down and start over so we removed the shelf, bar and doors, then sanded and primed it:
Then we painted the interior a neutral color (SW's Linen), this is the neutral color that we're using on the main rooms of our house so I count it as "free" since I used what we already hand!
Next was to sand, prime and paint the trim. We hand sanded the trim with 100grit sandpaper enough to rough it up so paint could stick and to get through the top layer of disgusting oil-based paint. Then I taped the wall above the trim with blue painters tape and used a 2 inch angle brush to prime (one layer) and paint (one layer). I have found that painting trim with long brisk brush strokes results in a much better look (much smoother) than trying to go slow and get straight lines (what I did at first.)
You can see in the last picture I had painted the wall access panel the same color as the wall but I later decided that I liked it better matching the trim so repainted it.
Now it's all painted and ready to be reassembled so you need to decide what you want the setup of your closet to be. We looked at closet systems at Home Depot for inspiration and for the basics it runs anywhere from $70 to $200 for just the starter kit. This is not in our budget so we set out to recreate this and more for less money.
Enter - CRAIGSLIST!! I know, I know...I'm an addict.
Micheal found a shelving and drawer system on CL for $30, so we went and picked it up and started designing around it. I decided that I wanted the system in the middle with a high and low bar on one side for shirts and pants and a high bar on the other for long items such as dresses and skirts. This required us to purchase 3 bars @ $8/piece.
Here is the unit-
With the drawers and bars this unit would have cost approximately $250 from Home Depot - our budget model, $54!!
Problem #1:
The first of our difficulties in retrofitting this piece of furniture to the existing closet was that it was about 1 inch taller than the existing shelve mount (which we would be reusing.) So our first fix was to put 1x1 wood pieces (leftovers from another project - "free"!) around the shelving mount to try and level it out:
Problem #2:
This made it just a shade too tall...ugh... The only tool we had that we could try to trim the ends was a jigsaw...I don't have any pictures of this because it did not go well...at all...
To try and maintain our sanity and the usability of the closet unit we went to Home Depot to invest in the proper tools (le sigh...so expensive).
Let's just say after the jigsaw debacle one side of the shelf was now a bit short so we used the aforementioned 1x1 pieces of wood (still free!) instead to increase the height of the closet unit. So after some trimming and screwing it was the right height!
Oh yeah...power tools baby - look at that smile!
We were fortunate to have wood mounts already attached to the wall so Micheal was able to drill the high bars directly into the wall, then attached them to the shelving unit by drilling a starter hole and using two bolts to attach the bracket.
The bracket...was a smiley face!
Micheal says "Measure twice, cut/drill once!"
After we installed the three bars this was the finished project!!
I LOVE it!! I stained two pieces of wood with our red stain (again from another project) to use as the shelve above the closet unit. I'll post pics of it once I upload them. I'm so proud of our effort as this was a test of our creativity, frugality and patience but has ended in a successful closet (that will only look this clean once!)
What do you think? Who wants their own custom CL closet?? If you have pictures of your closet that we could post or share for inspiration please send them on over!
Saturday, September 5, 2009
Weekend Warriors!!
Happy Labor Day weekend to all of my readers!! I hope you all have great plans in store for your 3 day weekend. Home Depot and Lowes are preparing for probably one of the busiest home renovation weekends by offering good sales on in stock items! Our Home Depot had 20% off in stock cabinets and countertops. Unfortunately we are not to that stage yet so we had to pass them buy...
When you are renovating your home but both work full time jobs so begins life of the evening and weekend renovation teams. It's best to make a plan and stick to it (we haven't done so well up until this weekend, we're trying to turn over a new leaf!) Our goal for this weekend is to finish as much of the master bedroom as we can. This includes:
1. Finishing my closet unit
2. Sanding and touching up the paint around the windows
3. Repainting at least one wall that has roller marks
4. Removing the can lights and repairing the holes in the ceiling
5. Scraping all the painted over glow-in-the-dark stars on the ceiling (really?!)
6. Painting the ceiling
7. Sanding and painting the casings for windows and doors
8. Sanding and staining my dresser
...and we need to mow the lawn!! Nothing too intensive right?? I'll post pictures throughout the weekend, and here's one just for fun since I'd hate to post without a picture.
Moshe enjoying the dishwasher box! Cuz he's a goof like that...
Subscribe to:
Posts (Atom)